


Patching a Tube
 A puncture in your tube doesn't have to mean the end of that tube's life. A patched tube is good for many, many more miles. Some riders keep adding patches to the same tube for years! Even if you prefer to carry a spare tube in case of a flat, so you don't have to patch a tube by the side of the road, you can keep your punctured tube, take it home, and fix it there—then it's your new spare!
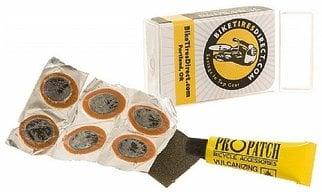
Here's how to do it. You'll need a patch kit, a pump of some sort, and whatever you need to get your tire on and off your rim. A pen might come in handy, but isn't necessary. Your patch kit will include patches, a small piece of sandpaper, a tube of vulcanizing fluid (glue), and simple instructions.
- Remove your tire and inspect the tire and tube for damage.
- Locate the puncture. Most of the time, it's easy to locate a leak by pumping a little air into the tube and finding the point where it escapes. If the hole is very small and difficult to locate, try holding the inflated tube underwater in a sink or bathtub and looking for escaping air bubbles. You may choose to mark the puncture with a pen so you don't lose it.
- Use the piece of sandpaper included in your patch kit to clean and slightly roughen the surface of the tube around the puncture. The area you roughen should be larger than the patch you're going to add.
- Apply a layer of glue—not too thick and not too thin—to the surface of the tube. Again, the area of the glue should be larger than the size of the patch you're going to apply.
- Wait for the glue to dry! Check your patch kit's instructions for specifics. Many glues need to dry until they are no longer tacky before the patch is applied.
- Apply the patch and press it onto the tube with your fingers for a minute or so, taking care to ensure the edges are firmly attached. Don't try to peel the clear plastic film off of the top of the patch—that can stay there.
- Often the patch is immediately ready to go and you can remount and inflate your tube and tire. To be sure, you might want to wait just a few minutes to allow the vulcanization to set completely.
- Re-install the tire and tube and go for a ride!
Glueless Patch Kits
Some companies offer "glueless patches," which allow you to skip the sometimes-messy gluing process and essentially just stick on a patch and go. These can be great for quick roadside repairs, but these patches tend to be not quite as effective, nor last as long, as regular vulcanizing patches.
As always, if we can offer any help, please give us a call at (503) 917-0156 or email us at [email protected].